

This is Richard! Richard loves movies! In fact, he loves movies so much that he saved his money for 15 years to build his very own cinema in his house. Now, when you say that someone has a ‘home cinema’ people often think of a big screen tv and some good speakers. As you can see from these images… this is not your average ‘home cinema’. The cinema is fully equipped and professionally calibrated for the perfect viewing experience and has been featured in multiple magazines due to the high quality of every detail that has gone into creating this incredible space.
And now it’s the location for one of my portrait shoots!
I’ve been wanting to expand my portrait portfolio recently and focus on shooting some interesting subjects. I won’t go into too much detail about Richard and who he is and how he is lucky enough to get his picture taken by me haha but these portraits will eventually be part of a bigger portrait project that I’m working on so keep your eyes peeled but don’t hold your breath as it’s a long term project so it might be a while in the making.
Anyway, I was asked recently by one of the blog readers, to do a little bit more behind the scenes stuff and to also explain how some of the images are created. So I thought I would use these recent portraits and go into a little more detail about how they were done.
Having seen the cinema space before I knew exactly the sort of portrait that I was after and I had sketched out the idea to explain to Richard what I wanted. Excuse the awful sketch but I’ve included it because it’s a good example of achieving pretty much exactly what I had in my mind for the final shot. I’ve got lots of sketchbooks filled with random images I see in my head so when one comes to life, as it were, it’s always nice to compare the concept sketch and the finished piece.


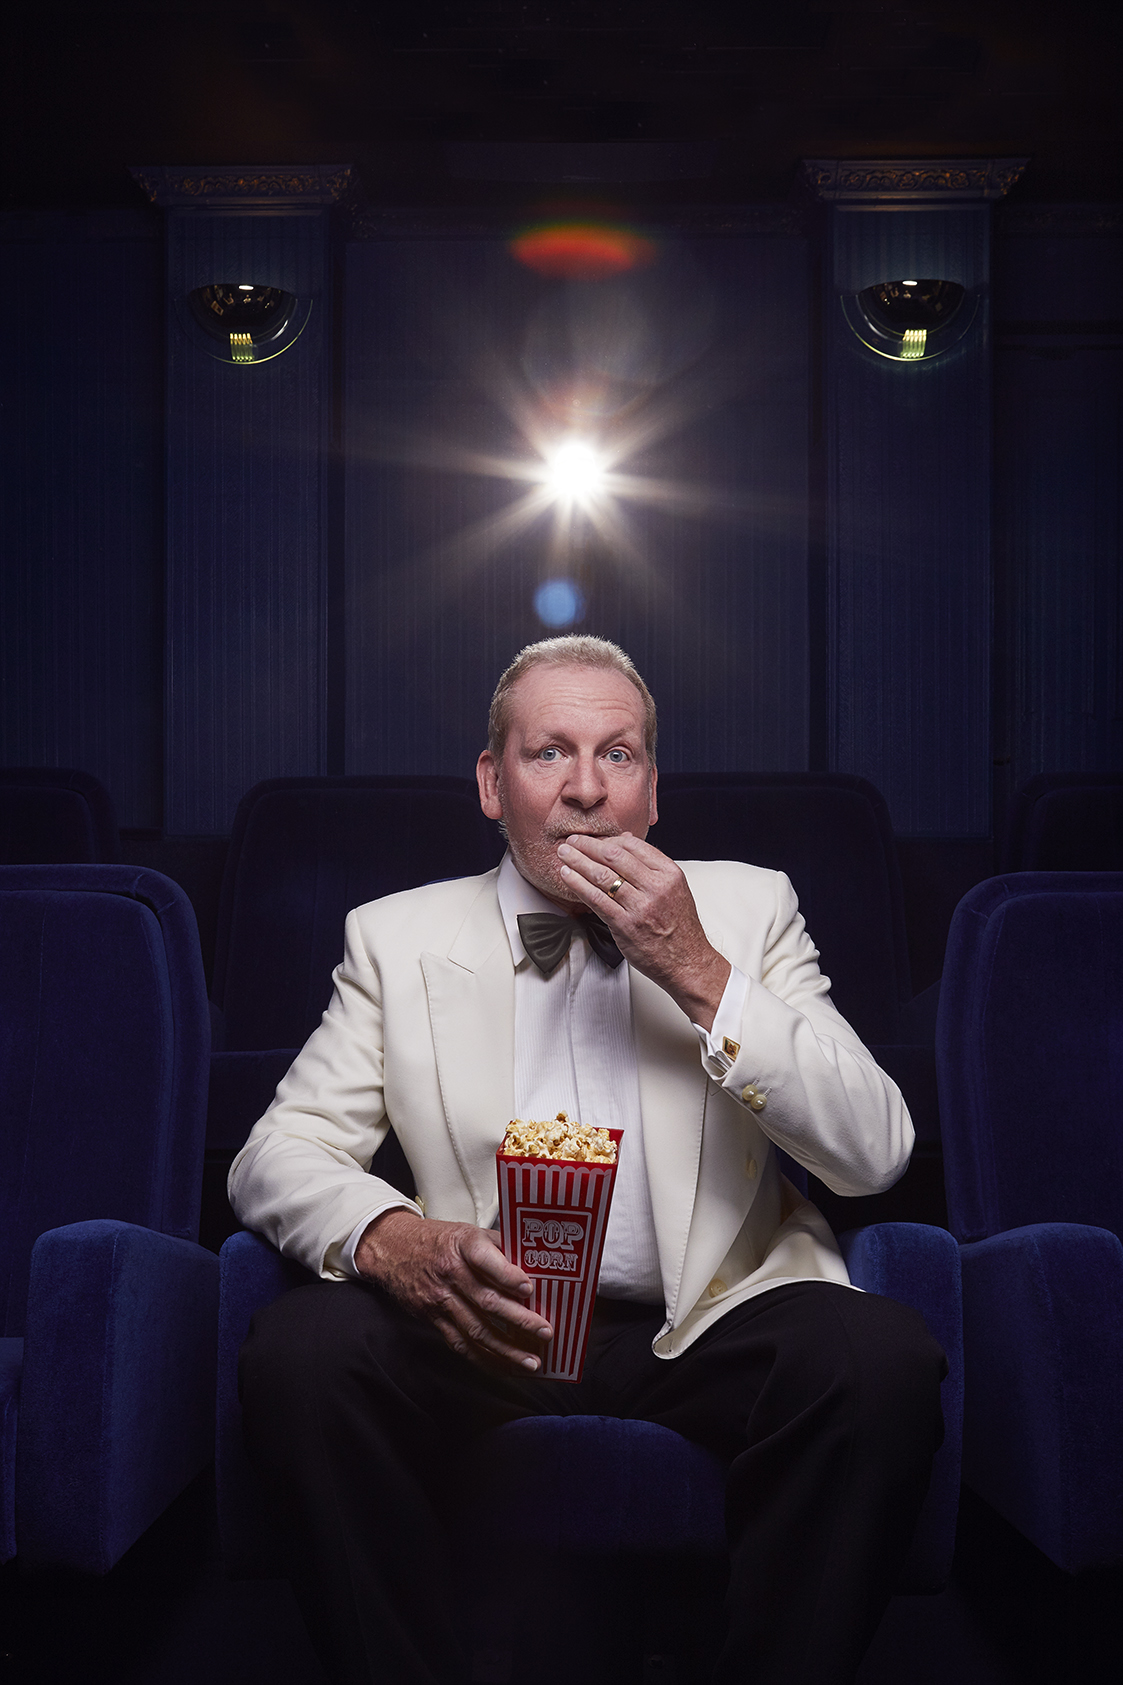
The lighting set up for these portraits was pretty simple. When shooting on location I always try and look at what the lighting patterns would be naturally for that space. To mimic the projector I used an Elinchrom Ranger flash head, with a snoot modifier, placed directly behind the subject. The snoot modifier narrows the light down and creates a similar look to a projector. I played with the height of the light to achieve the flare as well as the highlight on the back of the subjects head. For the front light, that would mimic the cinema screen, I used another Elinchrom flash head modified with a long softbox placed centrally above the camera position and directly in line with Richard on a boom arm. The lighting was set and I asked Richard to change into his tuxedo.
Once in his tuxedo, Richard lost some of the natural inhibitions most people get when a camera is in front of them and really got into it. I think there were some delusions of perhaps becoming the new James Bond or some sort of movie villain/hardman (image below)! Whatever it was I couldn’t have been happier with the results. So much so that the shots are already on the website in the portraits section. I hope you like them as much as I do!

Thanks for taking the time to read the blog and make sure you give it a like if you’ve enjoyed the content from this week or any of the previous week’s posts. Any feedback is always much appreciated. Anyway, have a great rest of your week and until next time… Stay Creative!
TECHNICAL
Images shot at
f11
125th/sec
ISO 200
This was a simple studio set up using the equipment listed below:
Camera: Canon 5D MK IV
https://www.canon.co.uk/cameras/eos-5d-mark-iv/
Software: Capture One Pro
https://www.captureone.com/en/
Lighting: 2 x Elinchrom Ranger RX S Head
https://www.elinchrom.com/battery/ranger-series.html
Elinchrom Snoot modifier: